Friday, June 20, 2014

Strawberry- Rhubarb Jam, Women's Day July 1950

Just look at this adorable Cover!

The girls are sisters, according to the magazine.  The picture looks like a family snapshot, not a photo shoot.  I love when I see sisters in matching outfits, probably because I don't have any sisters.  It's so '50s-'60s.  I often see twins, adults and children, in vintage ads wearing matching clothes.  I tried matching dresses for my girls when they were little but now at 16 and 13 if they accidentally wear a similar outfit there's a big discussion about                  who has to change.  Ah teenage girls!  What fun.

On to our recipe.  Despite watching my mother making strawberry jelly and even helping her as a kid I was intimidated at the idea of making it myself.  Not sure why.  It only has 4 ingredients.  The process takes a bit of time (Be prepared for a good bit of clean up too.)  but it's not that hard.  Maybe I just think of it as "advanced" because my mom did it.  I used rhubarb because my CSA had it in the box this week.  I've never had it or cooked with it before which added to the excitement of trying something new.  (If I only had a bucket list with making jam and trying rhubarb I'd get to cross 2 things off.  LOL.  I'm not into making bucket lists.  Chores are to be crossed off, not life's experiences.)

What you'll need:

The jars, pectin, and wax were available at my local hardware store.

Here's the recipe.  I didn't change much except I couldn't find Certo.  Bummer as the recipe is from Certo.


3C Washed and cut strawberries, organic if possible
1C Washed and chopped rhubarb (Do not peel.)
7C Sugar (Yes, 7!  WOW.)
1/2 Bottle of Certo or 1-3oz packet of liquid pectin, any brand

6-8 Washed jelly jars, 6-8 oz each
2 bricks of Paraffin wax, melted

Wash the jars, lids, and rings and heat the paraffin wax before starting.  If you want to sterilize your jars do so.  I read mixed information about the necessity of sterilizing jars so I just gave them a good scrubbing in hot water.  For extra safety I'll store the jelly in the fridge.

Put the strawberries and rhubarb in a large saucepan.  Add all that sugar.  Mix well and heat on high.  Use a potato masher if you have one to crush the fruit.  Bring fruit and sugar to a full boil.  Stir for 1 minute.  Remove from heat and stir in pectin.  Stir for 5 minutes and skim off the foam.  What is foam???


The pink bubbly stuff on top is foam.
 Ladle the hot jam into the jars one at a time, leaving about 3/4 of an inch at the top for the wax.  My jars, made by the Ball company, have a little decorative lip around the outside of the jars at the right spot.  (See pic below.) Then immediately pour about 1/8 inch of hot paraffin over the jam.  (My old Le Creuset pot with a spout is perfect for this task.)  Continue with the rest of the jars.  Cool completely (This takes a few hours.) and pour another 1/8 inch of paraffin over the first layer in each jar, carefully turning the jar at a slight angle to create a seal on the sides.  Allow the wax to start to harden then screw on the lids and rings while it's still warm so that suction forms as the wax cools.  Store in a cool dry place (3-6 months to be safe- some people keep it longer though.) or in the refrigerator for 6 months or more.

See the lip?  It's at 3/4 of an inch!

To remove the wax seal simply run a knife along the inner edge of the jar.  Press on one side to tilt the wax up and grasp the other side to lift it out of the jar.  Toss the wax and use the lid and ring to cover the jam.  Once the wax seal is broken the jam must be kept in the refrigerator and used within a few weeks.

The finished jam, complete with instructions for removing the wax.

Some people feel that wax sealing of jams and jellies is an outdated method and shouldn't be used for safety reasons.  If you're concerned use the hot bath method.  The Ball website has lots of helpful info and appliances you can buy if you want to become a canning queen or king.

So what did my family think?  I loved it on my toasted speedy artesian bread.  One of my daughters didn't believe jam could be made at home and thought the idea was weird.  (Eye-roll included.)  Once she got over that whole thing she said she liked the flavor but thought the texture was too thick.  (I agree.  I got sidetracked by my chatty plumber and let it cook a bit too long I think.)  My son said it tasted like strawberry ice cream, his favorite flavor.  My oldest prefers grape jelly but said this was pretty good for strawberry.  I didn't even mention the rhubarb!  So what does rhubarb taste like?  It gives the strawberries a different flavor.  Not exactly tart but more depth.  I can't put my finger on it.

Over all I'm glad I tried this and feel quite victorious, like I could save my family from a zombie apocalypse by bartering the jam for everything we needed.  I hope it doesn't come to that.

Sarah


Tuesday, June 10, 2014

Meal Planning and interesting ads from Family Circle, June 1950

I love this color-filled cover probably because I had a tri-colored collie growing up.  This pooch actually looks a bit like my beloved dog Howard.  The model looks relaxed, like she was just out with her dog picking flowers.  (Who wouldn't want to live that fantasy?  Ok, well maybe those who are dog- averse would prefer to go on a solo flower picking walk but everyone else...)   The pictures and articles inside are just as delightful.


On page 58 is an article about Mrs. Greene's meal planning advice to her daughter, Anne.  It doesn't say Anne's age but she appears to be in her last years of high school or her early 20's.  (Teens and young adults always look older in vintage pictures.  They're so well put together with their coiffed hair and lipstick.  Much nicer than an over made-up girl in low-cut yoga pants and a sheer t-shirt making fish lips at her iPhone camera.)  The idea is to teach young would-be brides home management.  (Something I doubt fish lips wouldn't care to learn.   Oops, I'm being b*tchy, aren't I?)  I just love articles like these.  The domestic arts, including home management, has been lost thru the years.  You could argue that home management isn't really an "art" but art is in the eye of the beholder, right?  And when a home isn't managed it sure isn't pretty!  

Here's a peek at the article.  Click the image to make it larger.


I love that Mrs. Greene starts with a "basic menu plan", which is a list of the foods needed for complete nutritional health, according to science of 1950 when this article was published.  It looks to be based on the Basic 7 which was developed during WWII to standardize Americans' nutritional needs during food rationing.  The Basic 7 was later condensed to the Basic 4 in the mid 50's.  When I menu plan I start with what is on sale and what my family likes.  Not a bad way to choose meals but probably not as nutritionally solid as Mrs. Greene's menus.  I also like how she incorporates her basic menu plan into only three meals- no snacks.  Seems like we Americans graze all day and the snacks we choose are more often treats and junk food than real food.  Just last week my high school sophomore was asked to bring snacks in for two of her classes.  One class requested Goldfish crackers and the other Smartpop popcorn.  Neither is horrible but the nutritional value is pretty low compared to what one would eat at the table.  I also have to ask why 16-17 year olds need a snack.  I understand it's the end of the school year and it's fun to celebrate but why is food necessary?  And in the case of the Goldfish why preschool food?  I don't think Mrs. Greene is giving her daughter Anne Goldfish in little single serve packages!

As you can see in the spread Mrs. Greene plans breakfast and lunch in addition to dinner.  I prefer to keep my meal planning flexible and serve leftovers for lunch but I kind of want to try planning breakfast menus.  We tend to get in a rut.  I make my two older daughters' breakfast when I'm just out of bed and half asleep so they get something simple- cereal, toast, or a pb and j with fruit.  I sometimes prepare these quick breakfasts only to find that one (or both!) of my girls isn't in the mood for it.  I make something else under duress not wanting to send the finicky eater(s) to school on an empty stomach.  My son gets up at 8am with quite a manly appetite often requesting leftover dinner for breakfast or eggs and toast.  So you may be thinking, "Poor Sarah sounds like a short order cook!"  That's what I'm thinking too.  I bet Mrs. Greene never felt like that.

Another page that caught my eye in this issue of Family Circle was the Libby's ad for fruit cocktail with a recipe for Creme Brûlée.  I love Creme Brûlée.  And I love fruit cocktail- in a nostalgic way.  But together it sounds like inedible.

A "cinch for any bride"!  Lol.

And on the back cover...SPAM!!  How 50's is that??  Did I ever tell you about the time my hubby had a craving for Spam at Costco?  (Do you know how many cans of Spam are in the warehouse size Spam package?!?)


In other news we have two new pets.  A mosquito fish named Kristen that my son's class used for their ecosystem project and her friend Monsieur Snail who serves as her maid.  (Son's word- not mine.)  I'm hoping to try out a recipe to post this week but with the end of school on Friday I may not make it.

I hope everyone is having a nice beginning to summer!

Sarah

Sunday, June 1, 2014

Chopped Beef Mounds with Noodles Women's Day June 1951 (FAIL!)

The beautiful cover of the June 1951 issue of Woman's Day.  

This should have been a success.  Beef and noodles were in the title.  My girls could live on pasta alone and my men could live on beef.  So what went wrong?  Following are the actual quotes I jotted down as everyone came to the table:

"Wow!  It looks like poooooop!!!!!!!!"

"What's wrong with the pasta?"

"Mom… I just don't think I can do this."

"Why does it smell like meatloaf?"

After a little encouragement begging I got everyone to try it.  And then I got to enjoy this:

"It tastes better than it looks.  I think it nom nom nom…" (The blessed child's mouth was too full to make out the rest.)

"Ok, I tried it.  Now can you make me a pb and j?  Pleeeeeeeeese???"

"Sorry, mom.  I just can't eat anymore."  (This was after one bite followed by what I hope was fake gagging.)

"What kind of meat is this??"  

I got one thumbs up and I liked it so I'm posting the recipe despite it being a "fail".  (It's a "fail" if not everyone likes it.)  Just be forewarned that if you don't like meatloaf you may want to skip it.

Here's the original recipe:


I doubled the recipe so here's what mine looked like:

1 15.5 ounce can of Tomato Sauce
1 LB Ground Beef
1/3C Italian Seasoned Bread Crumbs (I'm thinking It could have used more- like 1/2C)
1/2C Hot Water
Dash of Cayenne
1t Garlic Powder
Dash of salt
1 16 ounce package of corkscrew pasta
(I forgot the parsley!)

Preheat oven to 400.

Mix the ground beef with the tomato sauce.  (This is gross.  Use a spoon and just keep mixing it until the beef looks like really thick beanless chili.)  Then measure the hot water in a large measuring cup.  Add bread crumbs and seasonings.  (This will also look gross.  A bit like baby vomit.)  Mix well and add to the beef mixture.  Mix until it's all uniformly together.  It will be loose like… oh never mind.  I'll leave the analogy to you.

Spray a large baking sheet with cooking spray.  Using a large spoon or ice cream scoop spoon the mixture into 6 or 8 "mounds" on the baking sheet.  Bake in the oven about 30 minutes until done.

Make the pasta according to the package directions.

When "mounds" are done remove and place on a plate.  Tent with foil to keep warm.  Spoon the drained pasta onto the baking sheet and stir to pick up all the yummy drippings and greasy bits.  Keep moving the pasta around on the sheet until it's well coated.

Serve "mounds" on top of pasta.  Top with chopped parsley if you wish.  (I bought fresh and forgot to use it!!  I wonder if it would have made a difference to my table mates?)

Here's the finished product:


Make at your own risk!  ;)

Sarah

Sunday, May 25, 2014

Pie Times Two!

Yesterday I made two pies.  One apple and one cherry.  It may sound like a lot of work but my thinking is the kitchen was already going to be a mess and the simple vintage recipes I used don't require too many ingredients so why not?

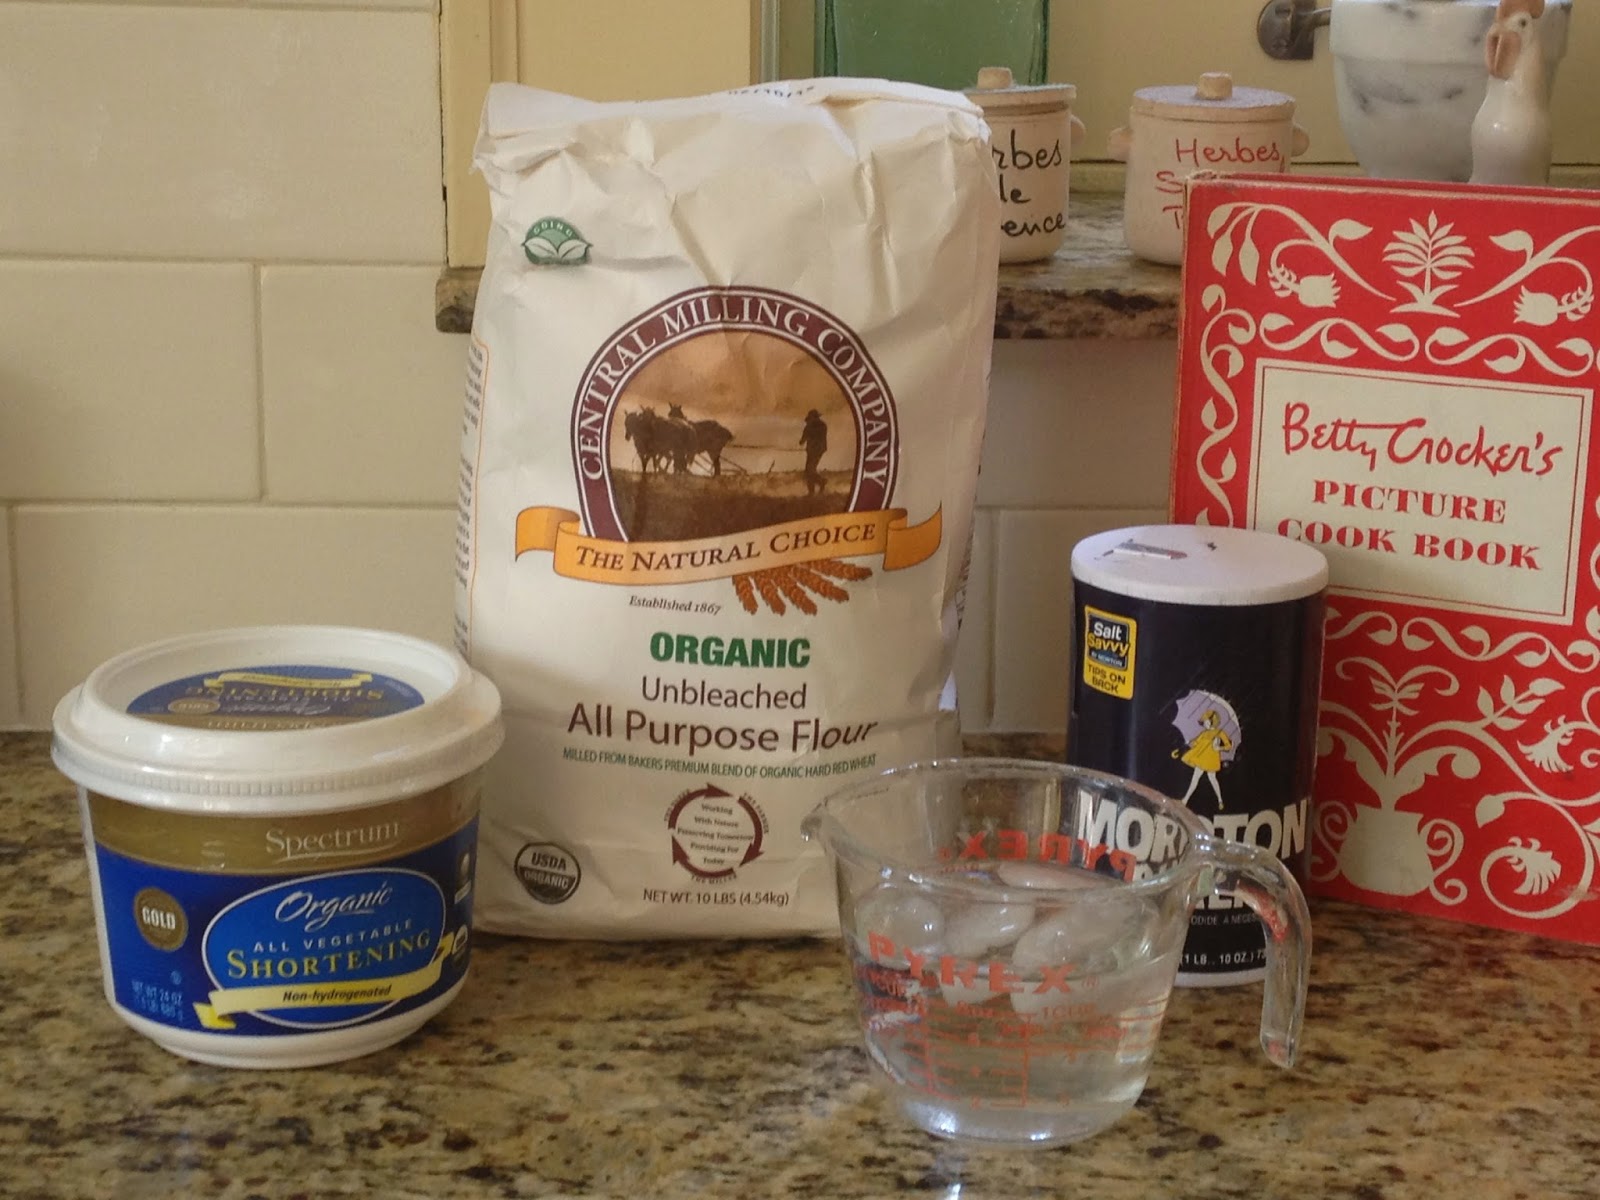
First the crust.  I used my 1950 edition of Betty Crocker's Picture Cookbook.  When I picked it up at an estate sale three older ladies stopped me on the way to the register and shared that they each had received this cookbook as a shower gift back in the 60's and it was their favorite.  They were darling and had been friends since high school.  So sweet!  Anyway, here's what you need:

Just 4 ingredients!

I followed the original recipe to a T except I had to use more water.  When you're working with 60 year old recipes and using new ingredients like non-hydrogenated shortening things may need to be altered.  Pie crust can be tricky too.  You don't want to handle it too much so add more water as soon as you see you need it and keep the mixing to a minimum.  This isn't like kneading bread.  Work it until it comes together and then s-t-o-p.

Here's the recipe:

Click to enlarge.

Mix the flour and salt.  Then cut in the shortening.  Here's a video showing how to cut in the shortening with a whisk.  If you have a pastry blender use it.  You can also use a fork.


Add the iced water to the starting with 4 tablespoons if making the 9 inch crust recipe and 3 tablespoons if making the 8 inch crust recipe.  Then add more water 2 tablespoons at a time until the dough holds together.  (DO NOT even think about using a mixer!!!  See the note above about pie crust.) Wrap it in plastic or use immediately.

Next I made the filling for the cherry pie.  It's from my mother's 1962 Better Homes and Gardens New Cookbook.  There aren't many notes in the book so I'm not sure if my mom used it a lot but it was always in the kitchen.  Until I took it of course!  Anyhoo here's the recipe:


I followed the recipe as it was written except I added another can of cherries (6 cups total) while keeping the sauce the same and I omitted the almond extract and the red food coloring.  You'll also notice how in the instructions it says to add salt to the flour and cherry juice.  Well I just noticed this now so I left that out too.  I tasted the sauce before I mixed in the cherries and it tasted good so I say the salt's optional.  Here's a picture of my ingredients:

Yes, that's it.  FOUR ingredients!
Follow the instructions above.  Here's a video showing how thick the sauce should be:


You may notice a few cherries in the sauce.  This is because I decided the syrup wasn't thick enough and had to take them out to heat it a bit more.  I was afraid the cherries would fall apart if I left them in for the second heating.  It was simple to remove the cherries with a fine mesh strainer, in case you have the same problem!

Pour the cherries and syrup into your crust lined pie pan and top with a second crust.**  Either use small cookie cutters to make holes for steam to escape or cut slits with a knife.

**Woah, girl!  How do I do that?  Ok here's how you roll out pie dough.  Sprinkle a little flour on your clean counter.  Cut the ball of dough in half.  Flatten one half with your fingers and then flatten more with a rolling pin or a hard plastic cup.  Try to get the thickness even.  You may need to turn the dough to get a round shape.  Use a flat metal spatula if necessary to loosen the dough from the counter without breaking.  If it does break just pinch it back together.  When it's the right size carefully lift one side off the counter, using the spatula if you need to unstick it, and fold it on top of the other side.  Then loosen the second side.  You should then be able to lift the entire pie crust and lay it in the pie pan.  Unfold.  Gently flatten the dough and trim the sides.  Then roll out the the top crust roll out the same way, pour in your filling,  lay it on top, and pinch both crusts together.  There are tools you can buy to make pretty fluted pie trim or just use the tips of your thumbs.

I didn't get to take a picture of the cherry pie before my son stuck his little finger in it (little stinker!) but you'll see it in the background in the video below where I talk about filling the apple pie.

Now it's time for apple pie!  I found this recipe in the 1962 Better Homes and Gardens New Cookbook too.  I think it's pretty perfect!  Ha ha...


And here's what I used:


I followed the directions in the original recipe (not the Red-Hot Apple Pie!) so just click on the recipe picture to enlarge.  Here's a video before the top crust is added.  Note the cherry pie before it was mauled by a naughty little boy.


Here's the yummy apple pie!  I used colored red and blue sugar for the top for a festive touch.


I had some extra apples and pie crust so I made a mini one.  Yummmm…..  I came down this morning to see one of my daughters eating a little slice for breakfast.  "It's like fruit, Mom!"  I suppose she could have chosen a worse breakfast.  ;)

While I had the time to spend in the kitchen making both pies at once you may not.  You can always divide up the tasks by making the dough for the crust the day before.  Or you could buy a ready-made crust in the dough section of your dairy aisle.  I prefer homemade pie crust but the Immaculate Baking Company's pie crust is pretty good when I just don't have the time.  Another time saver is to mix all of the dry ingredients (like the sugar mixture for the apple pie) beforehand.

So, what do you think?  Is it pie time in your house?!?!

I hope everyone has a fun and relaxing holiday weekend.  And for all our military service men and women, THANK YOU!!

Sarah

Friday, May 16, 2014

For my cyber buddy Averyl! Chick-Pea Sauce from Women's Day May 1951

One of my readers, Averyl, who writes the wonderful blog Outdated by Design, requested I post this recipe.  I haven't tried it but Averyl may so check out her blog!

Here you go, Averyl!


If anyone else tries this recipe chime in below in the comments.  :)

Sarah

PS.  Averyl also wrote one of my all time favorite blogs, American Women Didn't Get Fat in the 1950's, and Snark-free Cookery.  She's busy writing more books and isn't adding new material but both blogs, and her book, are great reads!  Check them out when you can.

Sunday, May 11, 2014

Happy Mother's Day, a brief book review, and a fun link!


It's Mothers Day 2014.  Luckily I'm still lolly-gagging in bed after having enjoyed a yummy breakfast complete with eggs, toast, grapefruit, coffee, and the sound of the smoke detector .  (I happily stayed put and let hubby explain it to the firemen.)  My adorable fourth child, who is the inspiration for the image choice above, is cuddled up with me taking a nap.

I'm hoping to round up the troops for a bike ride this afternoon but I may just milk this Mothers Day for all it's worth and stay in bed a bit longer.  I'm reading an enchanting and well written book entitled The Impossible Lives of Greta Wells about a 32 year old woman in 1985 who, after losing her twin brother to AIDS and breaking up with her boyfriend of 10 years, slips into a deep depression.   (Sounds like a downer doesn't it?  It's not!)  Her treatment takes her on a time travel journey in which she lives her life as a 1918 housewife and a 1941 wife and mother.  The time periods (1918 right after WWI and 1941 when WWII begins) in which she travels lets the 1985 Greta see herself shaped by the world around her.  Very thought provoking!

Just for fun I found this-  "True Cost of Being a Mom" by Nivene Judeh.


I love that Nivene included diamonds under the cost of living heading!  Go check out the whole article using the link above.

I hope everyone has a wonderful Sunday!

Sarah

Saturday, May 10, 2014

Meat Sauce, Women's Day May 1951

This week's recipe comes from an article in the May 1951 issue of Women's Day entitled, 16 Spaghetti Sauces.  They all looked pretty good expect for the "Chick-Pea Sauce" (As much as I like chick peas I just can't fathom them in anything else but salad.  I'm such a modern gal!)  The "Bread-Crumb Meat Sauce" just seemed weird.  Seemed like it would be dry.   Anyway, I chose the Meat Sauce, per hubby's request.  (The Tuna-Fish Sauce kind of freaked him out. I thought it would be a nice meatless meal.  Maybe that's what scared him!  NO MEAT??  Well this had "flavor".  But I'm getting ahead of myself...)

Here's what you need:


I made a few changes to the recipe.  I omitted the green pepper as hubby absolutely hates it.  I'm not a big fan either so it's ok with me to leave it out.  Also I didn't have any crushed red pepper so I substituted cayenne pepper.  Just a dash.  At first it was a bit much but mellowed out with cooking and added depth to the flavor.  

Here's the original recipe:


Here are my ingredients:
1 Onion, really large, chopped
3 Cloves garlic (Each of the Dorot frozen garlic is 1 small clove.  Adjust accordingly if using fresh garlic.)
Olive oil
1LB Ground beef
5C Canned tomates
1.5C Tomato sauce
1/4C Fresh parsley, chopped
1t Basil 
1/2t Thyme
1T Salt (seems like a lot but it wasn't)
1/4t Pepper
Dash of Cayenne pepper

First let me talk about that onion.  The original recipe called for 2 onions.  As you know from my previous diversions into onion sizing I believe that onions were much smaller back in the '50's.  When I looked around my kitchen for an onion I saw that I only had a huge monster onion that appeared to be  genetically modified to grow bigger and faster.  But happily it wasn't. It was just a big organic onion.   Here's what it looked like chopped up:

I estimate it's 4-5 cups.
Cook the ground beef in a large pot over a medium high heat.  Drain the beef and set aside.  Add a little olive oil to the pot and heat to medium again.  Add chopped onions and garlic.  Sauté until fragrant.  Here's some video!


Then add the meat back into the pot.  Add the rest of the ingredients.  Stir well and simmer covered for 90 minutes.  


This makes a lot of sauce.  The original recipe said to use with a pound of spaghetti but I had a lot left over even with a healthy spaghetti to sauce ratio.  Here's what our plates looked like:


I would estimate this recipe made about 10 servings for us.  I put about half in the freezer to make a quick dinner later.  Hubby asked for me to save some in the fridge for his lunch the next day too.   I haven't tried the frozen sauce yet but if it's like most tomato based meat sauce it probably freezes well and will taste just as yummy as when it's made fresh.  

Guess what?  Everyone loved it!  Hubby even said it had enough flavor.  Seriously.  And this was after a week of work travel eating in restaurants!  (I really think it kills his tastebuds.)  Must be the long cooking time because I was afraid the amount of herbs wasn't enough.  I usually use a lot more when I wing it tossing canned tomatoes with bottled Italian seasoning.  The flavors really melded well together and as I mentioned the cayenne added some depth to the flavor without making the sauce spicy.  

Enjoy!

Sarah