Sunday, March 30, 2014

Cheesy Tuna Bake, American Home magazine, March 1949

Ok, truth be told this is just Tuna Casserole.  But I couldn't call it that.  "Tuna Casserole" brings back memories of canned cream of mushroom soup, tuna, and peas heated with pasta and heaped onto a plate in a big sloppy mess.  Doesn't all that '70s goodness sound appetizing?

Here's the original recipe:


Here's my version:

1 lb Box of pasta, cooked al dente
2 T Butter
2 T Flour
1 C Milk (I use whole milk as this is what we have in the house)
Salt and pepper to taste
1/4 lb Deli American cheese
1-7 OZ Can of tuna
1/3 C Unseasoned breadcrumbs
1/2 t Garlic powder
1T melted butter

Heat the butter over a medium low heat in a large pot.  (Why a large pot?  So you can mix everything in it and not have to wash a bowl too.)  Stir in flour.  Add milk slowly and stir until there are no lumps.  Use a whisk if you like and pretend you're Julia Child.  Add salt and pepper to taste.  Boil until the sauce thickens a tiny bit.  (Congrats.  You just made a white sauce, the classic kitchen staple before Campbells' Mad Men told us we could cook with their soup.)

Preheat oven to 400.  Take the pot off the heat.  Add the cheese.  Melt and stir.  Add the tuna, separating with a fork, and stir so it's distributed evenly.  Stir in the pasta.  Put it all in a casserole dish.  Mix breadcrumbs with garlic powder and then with melted butter.  Sprinkle over tuna/pasta mixture.  Bake for 15 minutes or until breadcrumbs are brown and tuna/pasta mixture is heated thru.

Here's what you get:


My family thought it was good.  Kind of like mac and cheese with tuna, which I suppose it is.  I served it with a crudite plate and overpriced organic strawberries.  Everyone liked it for dinner but the leftovers didn't fair so well.  The re-heating made it a bit dry.  The pooch didn't mind and loved it as a topping on his usual dinner.

Just for fun here's the picture of how Cheese Tuna Casserole is supposed to be served:


Apparently you're supposed to leave the tuna unmixed and pop it out of the can in the center of the pasta.  Then garnish it with dried parsley.  They're really trying to elevate this dish to a gourmet meal.   But this is after the war.  Things were looking up.  War rations were a thing of the past as was the economic uncertainty of the Great Depression.  Perhaps radishes cut to look like roses was all it took to feel good about life again.

Here's the cover of the magazine. (Never heard of American Home Magazine?  Check it out here and in my post here.)  It's just darling and really captures the idealism of the 1950's which was just nine months away when this issue hit newsstands.


These kids look appropriately bundled for the kind of March we've been having.  I hope it's beginning to feel spring-like where you live.  The sun is out today but I still need a jacket...sigh...

Sarah

Monday, March 24, 2014

New post coming this week!

It's been a bit crazy around here.  Seems like every night last week we had 2-3 activities.  I barely cooked much less tried a new recipe.  I stuck to our old favorites when I did.  BBQ chicken sandwiches with homemade BBQ sauce, spaghetti and meat sauce, steak, and I don't know what else!  One night was leftover buffet.  This is when I take out all the viable food in the fridge, heat it up, cut up some veggies if there aren't any leftover, and call it dinner.

What does dinner look like in your house when you get busy?

I heard on the radio this morning that after a hiatus more consumers are going out to restaurants again.  Apparently the Great Recession kept some families home in an effort to cut household expenses.  Did you and your family start cooking at home more when the Recession hit?  If so do you go to restaurants more now?  We generally go out either Friday or Saturday night for dinner and sometimes will grab lunch or brunch out one weekend day too.  Sometimes it's at a nicer restaurant.  Other times when we've been running errands and driving kids around all day it's the local sub shop or a diner.  This is a pattern we've had for years.  I still prefer home cooking the best!

Look for a new recipe this week!

Sarah

Thursday, March 13, 2014

Bonus post: Olive oil- food or beauty bargain?

The answer is both!  And guess what?  A high quality bottle of olive oil is pretty cheap when you think of all the treatments it can provide.  But first let me tell you how I got there.

For the past few years I've been avoiding conventional beauty products when I can in a effort to reduce my exposure to chemical toxins.  The more I read about perimenopause and environmental toxins the more I understood why chemical fragrances added to health and beauty products effect me negatively.  (Google the subject and you'll never run out of reading material!)  It started with headaches when I wore perfume.  Even my favorite scents that I'd worn forever.  Then it was household cleaners. (I'll do another post about my favorite household cleaning alternatives.)  Soon my doctor noticed my hormones were imbalanced.  So I looked for options.  First it was L'Occitane products.  They aren't an organic company but being based in France their products can't contain some bad additives that are allowed here in the US.  (European countries also restrict the use of many chemicals used in food manufacturing here in the US.)  I liked and still use some of their body washes and I can't live without their hair oil.  But their skincare left me with small breakouts and who needs that?  Thus began my descent into olive oil, baking soda, apple cider vinegar, and coconut oil.  But today I'm only going to talk about olive oil.  There's just that many uses!

1)  Face Wash:  Mix 3 parts olive oil and 1 part castor oil.  (For more acne prone skin use more castor oil and less olive oil.  Read more about castor oil's benefits here.  It's antibacterial!)  Place a bit in your palm, about the diameter of a quarter.  Rub palms together to warm up the oil.  Rub gently on the face massaging the skin.  I use L'Occitane eye make up remover before the oil but the oil can remove eye make up too.  Depends on how much I'm wearing.  Place a hot rung out washcloth over the face for a few seconds.  Gently wipe off the oil.  Repeat as necessary to remove the oil or leave a little on if your face is very dry.  (In the summer I rinse out my washcloth three times but in the winter only twice.)  Follow with moisturizer if you need it and eye cream of your choice.


2)  Hair Detangler and deep conditioner:  My Little Miss Sweet 16 has been sick and in bed for a week. She woke up with the biggest tangled mess in her hair.   The plan was to hang out, have some mother-daughter brushing-bonding time, and watch Frozen via Apple TV. I couldn't get a brush thru her hair without her screaming like she was five years old.  Not a very bonding experience for either of us.  Olive oil to the rescue!  I simply poured a bit into a bowl, dipped my fingers in and massaged the oil into the knotted area.  I was even able to separate the strands a little before using the brush again.  All was as peaceful as a Disney movie before the mother dies.  To deep condition leave the oil on the hair for a half hour or more.  Be sure to protect your clothing with an old towel or wear an old t-shirt.  The oil may stain.  Rinse with warm water and then use shampoo.  Condition if you want but you probably won't need it.

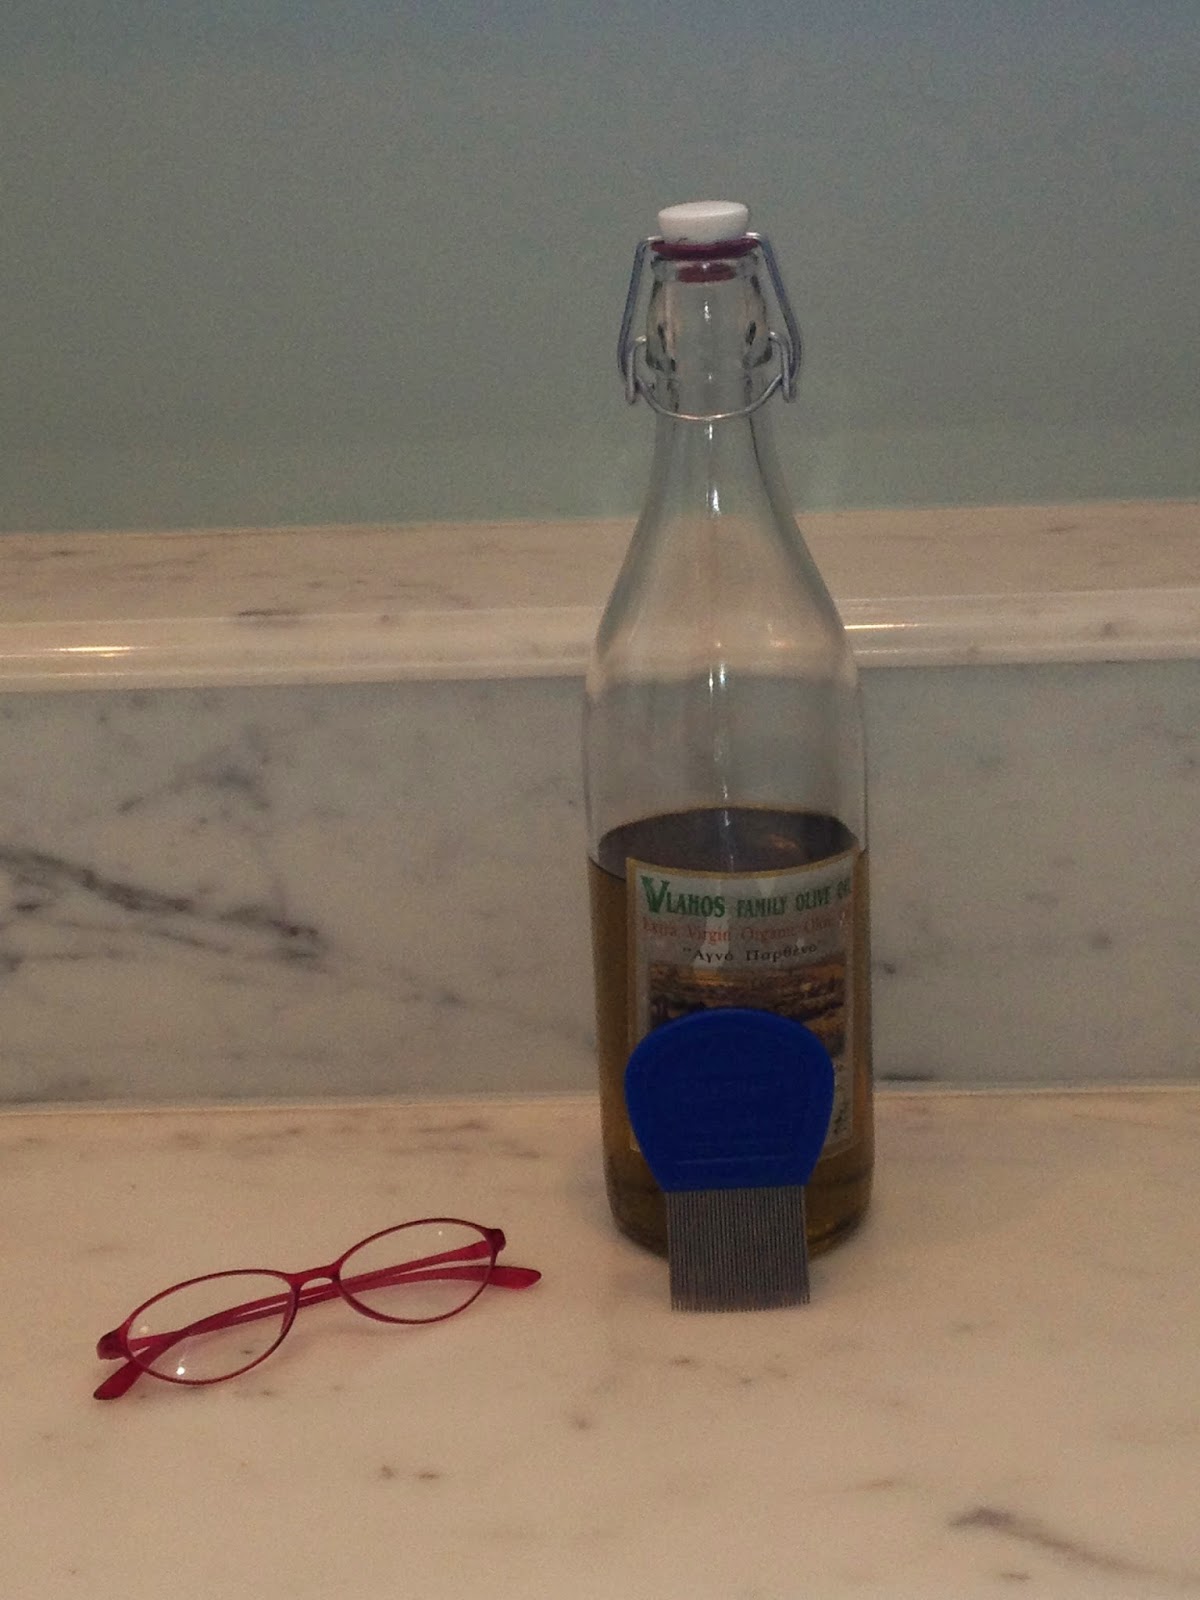
3)  Lice Treatment:  Spread the  oil all over the head and cover with a disposable plastic shower cap.  Keep on overnight if you can.  Or start in the morning and wash the hair after dinner.  If there are any nits the oil will smother them.  Your child's school may still require the nits be removed.  If so go thru each strand of hair with a lice comb before you wash the hair and then again once the hair has dried.  (Now we know where the term "nit picking" comes from!)  This may be a good time to invest in a pair of magnifying reading glasses from the drugstore and some movies On Demand.


4)  Pump up your moisturizer:  Adding a few drops of olive oil to my face moisturizer can do wonders and doesn't make me break out.  I just mix it into the moisturizer with my fingers and gently rub it on my face.  I'm in my late 40's and like many women my age I'm trying to prevent wrinkles but unfortunately most anti aging creams leave me with the acne of a teenager.  I'm currently using CeraVe PM Facial Moisturizer.  It's not organic but it is fragrance free.  The added olive oil just makes it a bit better when my skin feels more dry than usual.  I tried their day version with sunscreen but it makes me breakout. Sigh...

5)  Keratosis Pilaris:  You know those little bumps on the back of your arms?  If you don't then consider yourself blessed.  I've had these my whole life.  (It runs in my mother's side of the family and until I was in college I thought it was a genetic defect called "Bashuk Bumps" that was named after our family!  Then I met my friend Lauren who gets them too.  She once asked her dermatologist about her "Bashuk Bumps".  Seriously.  It was hilarious!) It's officially called Keratosis Pilaris.  I've tried many, many methods to remove the bumps including some dermatologist recommendations but nothing worked.  And then I found my friend olive oil.  I mix it with a heavy cream (I'm currently using CeraVE SA Renewing Cream.  I swear I don't work for them.  I think I got a coupon and just ran with it!) as described above but I use about 5 drops of olive oil.  Rub it on twice a day.  Wait a few minutes before dressing.

6)  Cuticle oil:  This is a no brainer.  Simply massage it into your nail beds at night or whenever you're handling olive oil in the kitchen.  (I'f I'm rubbing oil on a chicken I wash my hands first and then wipe a bit of the oil that's dripped on the side of the bottle.  You really don't need very much.)  If you've got an empty bottle of store bought nail oil (the kind with a nail polish brush) just use a tiny funnel to put the oil in and keep it by your bed side.  If not buy a little travel bottle but put it on in the bathroom so you don't stain your sheets.

There is a wide range of olive oils on the market.  I prefer to buy minimally refined organic oil.  My favorite is an oil imported from Greece by the owner of a local diner.  The olive orchards have been in his family for over 100 years!  (If you're ever on Chicago's beautiful North Shore check out Cafe Buon Giorno in Winnetka.  They serve delicious soups, salads, breakfast dishes, and sandwiches all made from real ingredients.  No freaky flavor enhancers. )  Buy the best quality you can afford.  The skin is the body's largest organ and it absorbs the things we put on it.  After I'd been using the olive oil face wash for a few months I was due for some blood work.  My HDL was never better and my overall cholesterol was down too.  I can't say this will impact your health in the same way but it's an added benefit if it does!

My favorite olive oil.
Giving up conventional health and beauty products doesn't have to be all or nothing, just like healthy eating.  Eliminating just one product in your bathroom reduces your overall chemical exposure.  I've found alternatives for shampoo, conditioner, and deodorant too.  I'll post those another time.

Have you tried any of these uses for olive oil?  If so tell me about your experience in the comments below.  I hope this information is helpful!

Sarah

Tuesday, March 4, 2014

Chicken Marengo, Everywoman's March 1955


I'd never heard of this magazine before but I now have a bunch of them.  (Apparently Mrs. Katz Cohn was a fan.)  Luckily on page 3 of this issue is a letter from the publisher explaining why the magazine is less expensive than most women's magazines of the day.  Everywoman's magazine was a publication sold in grocery stores only.  It wasn't sponsored by the grocery stores, just distributed directly from the publisher with no middle man.  Thus the price was only 5¢ versus the standard 25¢ to 35¢ for traditionally distributed magazines.  Family Circle started out this way too but is now published and distributed thru a magazine publisher.

So on to our Chicken Marengo.  First before I forget- this went very well with white rice.  You need something to sop up all the delicious juices.  Yummy bread would work too.  I served sautéed spinach as our vegetable.

Here's the original recipe:


I didn't change much except the onion situation.  12 small whole onions weren't to be found in my grocery store.  It's that whole onion sizing thing again.  Also I didn't add the green pepper and tomato at the end.  Tomatoes are awful this time of year and hubby detests green pepper.

Here's my version:

1 chicken, cut in 8 pieces
1 large white onion, sliced thinly
1-8oz package of sliced mushrooms
Rind of l lemon, juice from 1/2 of the lemon (It was a really big lemon and needed to save the other half for my son- he has a sore throat.)
1-11.5 oz Can tomato juice
1/2C Flour with salt and pepper to taste
6T Olive oil
1-1/2t Salt
1/2t Pepper
1/2t Thyme

First heat half of the oil in a large skillet.  Sauté the onions until translucent.  Remove from the pan.  Add the rest of the oil to the pan.  Dredge each piece of chicken in the flour and place skin side in the hot pan.  Turn each piece occasionally so that it browns all over.

While the chicken browns zest the lemon and juice half of it or the whole thing if your lemon is small.  My lemon was about 4 inches long.  This big:

It was organic too.  Go figure!

Then pour the tomato juice, salt, pepper, and thyme into the bowl with the lemon juice and rind.  (I used a large measuring cup.)  Mix well.  Once the chicken is all nice and brown put the onions and mushrooms into the pan.  Pour the lemon-tomato mixture.  Jostle the chicken around so the juice gets mixed in well with the veggies.  Cover and simmer over a low heat for 45 minutes or until chicken is done.  Serve with rice.  (Yay!  I didn't forget!!)


Everyone liked this dinner for the most part.  Hubby had seconds.  (Jackpot!!)  My Little Miss Sweet 16 ate the chicken mixed with the rice when I cut it off the bone for her.  (Big surprise.)  My middle daughter said she liked the rice plain (what?) and my son, who's throat was very sore, said it was worth the pain of swallowing.  If this isn't a positive endorsement I don't know what is!!

Enjoy!

Sunday, March 2, 2014

Toll House Chocolate Cookies, Everyday Foods, 1944 and a little about the estate sale that started it all!

Walking into the Katz Cohn home, crowded with crazed antique collectors and estate sale devotees, was a bit overwhelming.  There were too many people.  It was dusty.  There was so much to see that I lost my friend Susan, who came with me, almost immediately.  But when I turned left and saw the living room bookcases I took a big breath and foraged my way thru the crowd.  There in this beautiful and obviously formally decorated living room were four shelves of cookbooks, all covered in bright oilcloth.

I restrained myself and only bought 5 of the beautifully oil-clothed books.   


Have I ever mentioned how much I love oilcloth?   Especially vintage oilcloth.  The more colors the better.  Mrs. Katz Cohn didn't disappoint.   I crouched down and began going thru the books one at a time.  Some titles were labeled but most weren't.  The books all stuck together and every so often someone would reach over me to grab one for themselves.  Of course I was friendly but inside I was screaming, "Back off, bucko!  I was here first!!"

I happened upon this book, Everyday Foods.  It was first published in 1941 and then revised in 1944.   It was a Home Economics textbook!!!  If you're interested in vintage cooking this is sort of the holy grail.  Magazines are fun but you have to weed thru some wacky recipes like Tripe and applesauce Jello Salad to find meals that sound good.  (Want more food craziness?  Read this post.)  Home Ec in the 1950's was pretty reasonable.   It wasn't about impressing anyone with what you could do with a box of Jello.  The lessons were about running a home and making simple meals.  (Apparently by the late 1980's it was different.  Stacy, my good friend from college, was a Home Ec major.  One night when we were studying for finals she told me that a crown lamb roast could be cooked in the microwave if you covered the bones that stuck up with tin foil.  The foil just couldn't touch the sides, top, or bottom, of the micro.  Now that's way wacky!!)

Anyway, browsing thru this textbook I saw a recipe for "Toll House Chocolate Cookies".  It looked similar to the Toll House Chocolate Chip Cookie recipe I've been making since I was a child and is on every yellow bag of Toll House Chocolate Chips sold today.  Here's the original recipe:


The big differences are the original recipe calls for generic "fat", not specifically butter, the brown sugar and white sugar aren't in equal amounts, and the chocolate is from a bar and has to be chopped before adding to the batter.  (This is before the famous Toll House Chocolate chips, aka the stone age!!!)  Also the recipe is for a half batch, based on the modern recipe's ingredients, but it makes 50 small cookies.  I don't think I could ever get 50 cookies out of the 12 ounce bag recipe I use  (Partially because me and my kids have an addiction to raw cookie dough.  Hubby thinks we're nuts, which we may truly be...)  so these must have been some really tiny cookies.

This week was my oldest's 16th birthday so upon her request I made her a chocolate chip cookie cake.  She asked me not to experiment so didn't but I was honestly tempted.  Here's the recipe from the Toll House website.  It's the same as on the yellow package of chocolate chips.

2 1/4 cups all-purpose flour
1 teaspoon baking soda
1 teaspoon salt
1 cup (2 sticks) butter, softened
3/4 cup granulated sugar
3/4 cup packed brown sugar
1 teaspoon vanilla extract
2 large eggs
2 cups (12-oz. pkg.) NESTLÉ® TOLL HOUSE® Semi-Sweet Chocolate Morsels
1 cup chopped nuts
Directions

PREHEAT oven to 375° F.

COMBINE flour, baking soda and salt in small bowl. Beat butter, granulated sugar, brown sugar and vanilla extract in large mixer bowl until creamy. Add eggs, one at a time, beating well after each addition. Gradually beat in flour mixture. Stir in morsels and nuts. Drop by rounded tablespoon onto ungreased baking sheets.

BAKE for 9 to 11 minutes or until golden brown. Cool on baking sheets for 2 minutes; remove to wire racks to cool completely.

PAN COOKIE VARIATION: Grease 15 x 10-inch jelly-roll pan. Prepare dough as above. Spread into prepared pan. Bake for 20 to 25 minutes or until golden brown. Cool in pan on wire rack. Makes 4 dozen bars.

Here's my big girl's birthday cake.  I'm more of a baker than a cake decorator but she loved it nonetheless!


I'm working on a new recipe to post this week.  Stay tuned!  :)